A water heater leaking from the top may have a worn supply connector, a leaking shutoff valve, a problem at a threaded tank connection, or a leaking temperature and pressure relief valve. Water around an anode fitting, condensation on cold pipes, and moisture from equipment above the heater are other possibilities. The right repair depends on where the water first appears.
A wet top does not automatically mean the tank has failed. An external fitting may be repairable. However, water emerging from a damaged tank connection or the tank itself can mean replacement is necessary.
This guide explains what to check, how to limit further water damage, and which symptoms need professional attention. It focuses on storage-tank water heaters; tankless and hybrid models have additional components and model-specific procedures.
Water Heater Leaking From the Top: Quick Diagnosis
| Where the water first appears | Possible cause | What to do next |
|---|---|---|
| At a supply connector or pipe joint | Failed seal, damaged connector, or leaking fitting | Have the joint and connector inspected |
| Around the cold-water shutoff valve | Valve-body, stem, or connection leak | Arrange valve repair or replacement |
| Around a top-mounted anode fitting | Leaking threaded connection or damaged tank opening | Have the fitting and tank connection checked |
| At the relief valve or its discharge pipe | Valve fault, overheating, pressure, or thermal expansion | Stop using the heater and arrange diagnosis |
| Across the cold pipe surface | Condensation or water tracking from above | Trace the moisture rather than assuming a tank leak |
| From beneath the top cover, with no visible source | Hidden connection leak or tank damage | Keep covers closed and call a professional |
Use the table to describe the symptom, not to select a replacement part without confirming the cause.
What to Do First When You Notice a Top Leak
Before approaching the heater, check for standing water, wet electrical equipment, steam, and other immediate hazards.
If you smell gas or hear a carbon monoxide alarm, leave the building. Do not operate switches, troubleshoot the heater, or use a phone inside. Call emergency services or your gas utility from outside, consistent with PSE&G’s gas-leak safety guidance.
If there is no gas emergency and the controls are safely accessible:
- Turn off the energy supply. For an electric heater, use its circuit breaker from a dry, safe location. For a gas model, follow the shutdown instructions for your unit only if you can do so safely and there is no suspected gas leak.
- Close the cold-water supply to the heater. This can limit incoming water. Do not force a seized or badly corroded valve. If you cannot isolate an active leak, contact an emergency plumber; use the building’s main water shutoff only if you know how and can reach it safely.
- Keep clear of wet electrical parts and hot discharge. Do not remove the junction-box cover, thermostat covers, or top jacket.
- Document the leak from a safe position. Take a photograph of the first wet connection and note whether the leak started after installation, maintenance, or a heating cycle.
Closing the inlet does not instantly empty or depressurize a hot tank. Do not loosen a connection, remove a valve, or drain the heater as a quick diagnostic test.
1. A Supply Connector or Pipe Joint Is Leaking
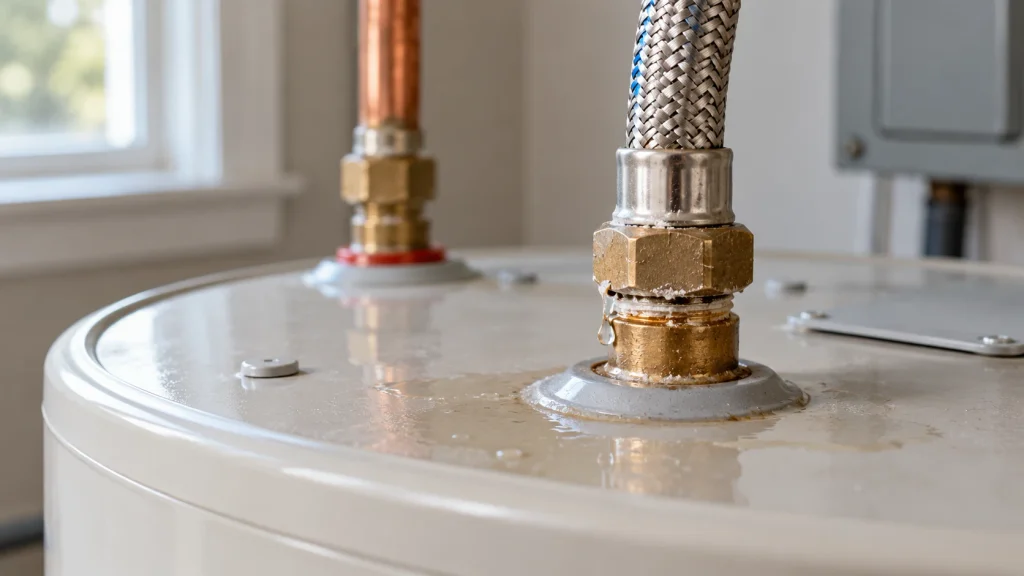
On many storage heaters, the cold-water inlet and hot-water outlet connect at the top. The connection may use rigid pipe, a flexible connector, or another manufacturer-approved arrangement.
Look for a bead of water at a joint, a wet connector, or mineral deposits around a fitting. Water can then spread across the top and run down the jacket, making the leak look larger or farther from its source.
How This Type of Leak Is Stopped
A plumber needs to distinguish a leaking connector seal from damaged threads or a failed fitting. Possible repairs include replacing a connector or washer, or resealing a suitable threaded connection after the heater has been isolated safely.
Do not assume that adding thread tape or tightening every visible nut is the answer. Different joints seal differently, and excessive force can damage the connection. A. O. Smith recommends checking top fittings in its water heater leak troubleshooting guide.
When requesting service, describe the exact location: “water at the connector nut” is more useful than “the whole heater is leaking.”
2. The Cold-Water Shutoff Valve Is Leaking
The shutoff valve sits on the pipe supplying cold water to the heater. If it is above the tank, a leak from its body or connections may drip onto the top.
Check visually for moisture around the handle or stem, the valve body, and the joints on either side. If the valve is wet but the fitting directly below is dry, mention that distinction to the plumber.
What the Repair Involves
The correct repair depends on the valve design and the failed part. The plumber may service an appropriate seal or replace the valve. A corroded valve should not be repeatedly forced open and closed to see whether it stops dripping.
If this valve is the source, closing it may not stop water escaping from its upstream side. That is a reason to request help with isolating the supply, rather than assuming the tank is still producing the water.
3. Water Is Seeping Around a Top Fitting or Anode Port
Some heaters have a separate anode fitting accessible from the top; others use a different arrangement. The anode helps protect the tank from corrosion, but the presence of an anode does not identify the source of a top leak by itself.
Water around a fitting may come from its threaded connection, from an adjacent pipe, or from damage at the tank opening. Recent anode or plumbing work is useful information, but it does not prove the repair was performed incorrectly.
Why the Tank Connection Matters
A connection that can be resealed is different from a damaged opening welded into the tank. One Professional should establish which part is leaking before recommending a repair.
A. O. Smith’s manufacturer troubleshooting reference includes anode fittings among its leak checkpoints. Use your own model’s manual to identify the relevant components; do not pry out plugs or remove insulation to find them.
Do not remove the anode and permanently plug its opening as a leak remedy. Ask the technician to preserve the corrosion-protection arrangement required for the heater.
4. The Temperature and Pressure Relief Valve Is Leaking
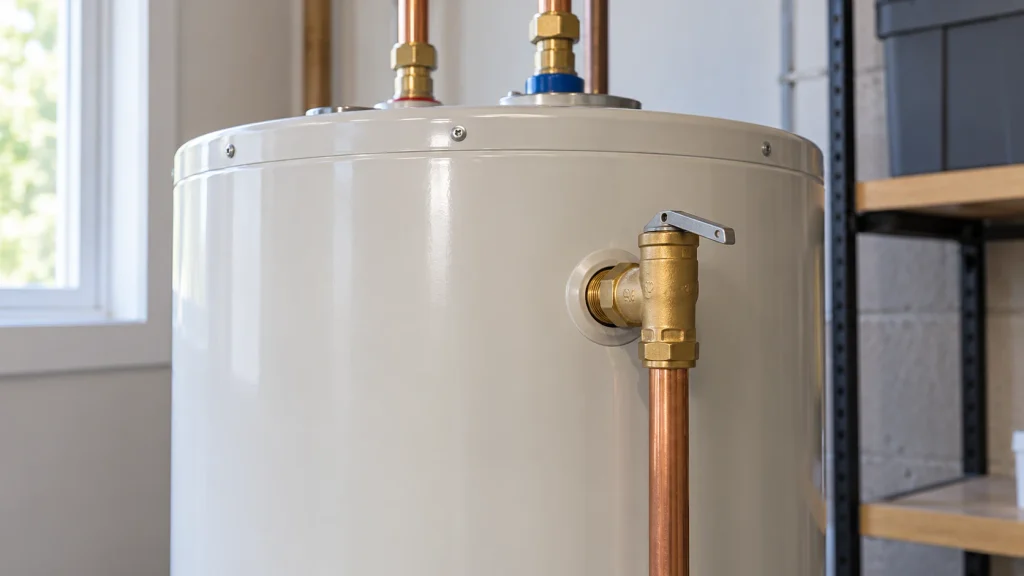
The temperature and pressure relief valve, usually called the T&P valve, is a safety device. Depending on the heater, it may be fitted at the top or high on the side.
Identify whether water is escaping around the threaded tank connection or coming through the valve’s discharge pipe. These are different symptoms. The pipe may carry the water well away from the valve, so follow its route visually without touching it.
Do Not Block the Discharge Pipe
Never cap, plug, or restrict a relief discharge pipe. Do not lift the lever as an improvised leak test: the valve can release dangerously hot water.
A technician should check the valve, the threaded connection, and the conditions causing any discharge. Replacing the valve alone will not correct an underlying pressure or overheating problem. A. O. Smith’s T&P valve technical bulletin distinguishes connection seepage from valve discharge.
If there is steam, forceful hot-water discharge, or suspected overheating, keep clear and request urgent service.
5. Pressure or Thermal Expansion Is Exposing a Weak Connection
Water expands as it heats. In a closed plumbing system, that expansion needs to be accommodated. Excessive pressure can contribute to relief-valve discharge or stress on plumbing components.
Tell the technician if the drip appears during recovery after hot-water use, stops between heating cycles, or accompanies other pressure symptoms. Timing is a clue, not a diagnosis.
What Needs Checking
The technician may assess supply pressure, thermal expansion, any pressure-reducing valve, and the condition and sizing of an installed expansion tank.
An expansion tank can also be an external leak source: if one is above the heater, inspect its visible surroundings from a safe position. Do not climb onto the water heater or disturb unsupported piping.
For background, see A. O. Smith’s thermal expansion bulletin. Do not remove a backflow device or rely on the relief valve to manage routine expansion.
6. Condensation or Water From Above Resembles a Top Leak
Moisture on a cold-water pipe can form when humid air contacts the cold surface. It may run toward the tank even though the pipe is not leaking at a joint. A. O. Smith discusses pipe condensation alongside plumbing leaks in its bulletin on water collecting around a heater.
Also look above the heater. A wet ceiling, an unrelated pipe, or nearby equipment may be the source. Do not assume that the appliance underneath the water is the appliance that failed.
Hybrid and Gas Models Need Additional Checks
Heat-pump water heaters produce condensate during operation. A drainage problem near the upper heat-pump assembly needs a model-specific assessment; it does not automatically mean the storage tank is leaking. Rheem explains this distinction in its heat-pump condensate blockage bulletin.
On gas models, water around the vent or draft hood also warrants professional attention. Do not disconnect or cover venting to stop a drip.
Temporary moisture alone cannot establish that continued operation is safe. Persistent or unexplained water needs investigation.
7. A Hidden Tank Leak Is Reaching the Top Cover
If water appears from beneath the top jacket and the visible fittings are dry, the source may be hidden. A leak from a connection can travel under the casing, while a damaged tank or welded connection may require replacement.
Avoid diagnosing tank failure from exterior rust alone. Conversely, a small amount of visible water is not proof that the problem is minor.
When Replacement Becomes Necessary
A professional should confirm whether the pressure-containing tank is leaking. A confirmed tank leak generally calls for replacement, rather than an external patch. Tape, epoxy, and sealant applied to the jacket cannot restore the tank’s structural integrity.
Rheem provides a manufacturer diagnostic reference in Technical Bulletin 1223: How to Diagnose a Leaking Water Heater. Diagnosis should follow the correct procedure for the actual model.
Water running down from above can also collect at the base. If the source is lower down or remains uncertain, read our guide to a water heater leaking from the bottom.
How to Stop a Water Heater Leaking From the Top
The practical sequence is isolate safely, identify the first wet point, then repair the confirmed cause. Stopping visible dripping temporarily is not the same as resolving the fault.
Before the service visit, prepare these details:
- The model and serial number, if readable without approaching a hazard.
- A photograph of the wet area and surrounding pipes.
- When the leak began and whether maintenance was recently performed.
- Whether water appears continuously or only during heating.
- Any error message, unusual discharge, or loss of hot water.
Request a diagnosis that names the failed component and explains whether pressure, corrosion, or installation conditions also need attention. This makes the repair proposal easier to assess and reduces the chance of replacing unrelated parts.
After repair, follow the manufacturer’s restart procedure. An electric storage heater must be filled and purged of air before its heating elements are energized. If water reached electrical components, those components need assessment before power is restored.
Repair or Replace the Water Heater?
For a water heater leaking from the top, the source matters more than the location of the puddle.
| Repair may be appropriate | Replacement needs consideration |
|---|---|
| An isolated connector or external valve has failed | The storage tank is confirmed to be leaking |
| A serviceable threaded joint needs attention | A nonrepairable welded tank connection has failed |
| A pressure problem can be corrected and the tank remains sound | Significant deterioration accompanies repeated failures |
Ask for an itemized quote and check warranty coverage before approving work. Compare the complete scope, including isolation, replacement components, testing, and any required installation changes. A generic online price cannot account for access or local requirements.
If the heater also fails to produce hot water, our electric water heater not heating guide explains other possible faults. Address the active leak and electrical safety before troubleshooting heating performance.
Frequently Asked Questions
Can I keep using a water heater that leaks from the top?
Stop using an actively leaking heater until the source and safety of continued operation have been assessed. Even a connection leak can send water toward electrical equipment or building materials.
Does a top leak always mean I need a new tank?
No. An external connector or valve may be repairable. Replacement becomes necessary when the tank or a nonrepairable tank connection has failed. The wet top alone does not distinguish these situations.
Why did the leak start after a new water heater was installed?
The installer should check the connections and installation conditions. Record the first visible wet point and contact them promptly. Avoid altering the plumbing before a warranty or installation inspection.
Will tightening the inlet connection stop the leak?
Only if the actual fault is one that appropriate tightening can correct. A damaged connector, failed washer, corroded fitting, or tank opening needs a different solution. Do not force a connection on a hot, pressurized heater.
Why does the heater leak only while heating?
The heating cycle can make a pressure-related problem more noticeable. A professional can assess thermal expansion, relief discharge, and the condition of the leaking connection. Timing alone cannot identify which part needs replacement.
Why is there still water after I close the inlet valve?
The tank still contains water, and the plumbing may remain pressurized. The shutoff may not seal fully, or the leak may be upstream of it. Do not loosen fittings to investigate; request help if water continues accumulating.
Final Thoughts
A water heater leaking from the top needs a source-based diagnosis. Start with safely accessible observations of the supply connections, shutoff valve, relief system, and any water coming from above.
Have the confirmed fault repaired before restarting the heater. An external connection leak and a failed storage tank need different solutions; identifying that difference is the most useful first step.
For a separate gas-heater ignition problem, see why a gas water heater pilot light will not stay lit. A gas smell or carbon monoxide alarm requires evacuation, not pilot-light troubleshooting.
This guide provides general information. Follow the instructions for your model and local plumbing, electrical, and gas requirements. The photographs are AI-generated illustrations, not documentation of a diagnosed installation.